server 受 ssh暴力登入攻擊的分析與防禦(1)--iptables 的使用
最近 server 遭遇到暴力攻擊行為,從 /var/log/auth.log 可以看到不斷有人嘗試用不同帳號密碼登入ssh
輸入指令查看最後20行紀錄:
sudo watch tail /var/log/auth.log -n 20結果:
Jan 30 20:44:14 server sshd[3833449]: Failed password for root from 103.233.3.137 port 52604 ssh2
Jan 30 20:44:14 server sshd[3833449]: Received disconnect from 103.233.3.137 port 52604:11: Bye Bye [preauth]Jan 30 20:44:14 server sshd[3833449]: Disconnected from authenticating user root 103.233.3.137 port 52604 [preauth]
Jan 30 20:44:17 server sshd[3833466]: pam_unix(sshd:auth): authentication failure; logname= uid=0 euid=0 tty=ssh ruser= rhost=68.183.115.108  user=root
Jan 30 20:44:19 server sshd[3833466]: Failed password for root from 68.183.115.108 port 56760 ssh2
Jan 30 20:44:20 server sshd[3833466]: Received disconnect from 68.183.115.108 port 56760:11: Bye Bye [preauth]
Jan 30 20:44:20 server sshd[3833466]: Disconnected from authenticating user root 68.183.115.108 port 56760 [preauth]
Jan 30 20:45:12 server sshd[3833633]: pam_unix(sshd:auth): authentication failure; logname= uid=0 euid=0 tty=ssh ruser= rhost=42.194.173.211  user=root
Jan 30 20:45:13 server sshd[3833633]: Failed password for root from 42.194.173.211 port 48978 ssh2
Jan 30 20:45:14 server sshd[3833633]: Received disconnect from 42.194.173.211 port 48978:11: Bye Bye [preauth]
Jan 30 20:45:14 server sshd[3833633]: Disconnected from authenticating user root 42.194.173.211 port 48978 [preauth]
Jan 30 20:45:25 server sshd[3833671]: Connection closed by 177.155.180.6 port 53125 [preauth]
Jan 30 20:46:12 server sshd[3833748]: Connection closed by 187.19.205.116 port 47405 [preauth]
Jan 30 20:46:40 server sshd[3833794]: pam_unix(sshd:auth): authentication failure; logname= uid=0 euid=0 tty=ssh ruser= rhost=210.94.133.243  user=root
Jan 30 20:46:42 server sshd[3833794]: Failed password for root from 210.94.133.243 port 41366 ssh2
Jan 30 20:46:43 server sshd[3833794]: Received disconnect from 210.94.133.243 port 41366:11: Bye Bye [preauth]
Jan 30 20:46:43 server sshd[3833794]: Disconnected from authenticating user root 210.94.133.243 port 41366 [preauth]
參考了下面這篇文章,設定 iptables 限制嘗試登入的次數:
 William Dye
建立規則
# 設定 ip list name 為 SSH
sudo iptables -A INPUT  -p tcp --dport 22 -m state --state NEW -m recent --set --name SSH

# 設定每小時只能嘗試5次,超過5次會記錄在log 中
sudo iptables -A INPUT  -p tcp --dport 22 -m state --state NEW -m recent --update --seconds 3600 --hitcount 5 --rttl --name SSH -j LOG --log-prefix 'SSH-HIT-RATE: '

# 設定每小時只能嘗試5次,超過5次會禁止連線
sudo iptables -A INPUT  -p tcp --dport 22 -m state --state NEW -m recent --update --seconds 3600 --hitcount 5 --rttl --name SSH -j DROP
iptables 的規則是從上而下按照順序進行匹配的,所以順序是有關係的。比方說,如果上面第三條跟第二條互換,由於第二條原本是LOG,互換之後變成DROP,就直接 drop 掉而不會記錄 log 了。
另外,iptables 指令的參數說明,可參考手冊 iptables-extension man page :
If the -p or --protocol was specified and if and only if an unknown option is encountered, iptables will try load a match module of the same name as the protocol, to try making the option available.


tcp
These extensions can be used if `--protocol tcp' is specified. It provides the following options:

[!] --destination-port,--dport port[:port]
    Destination port or port range specification. The flag --dport is a convenient alias for this option.


state
The "state" extension is a subset of the "conntrack" module. "state" allows access to the connection tracking state for this packet.

[!] --state state
    Where state is a comma separated list of the connection states to match. Only a subset of the states unterstood by "conntrack" are recognized: INVALID, ESTABLISHED, NEW, RELATED or UNTRACKED. For their description, see the "conntrack" heading in this manpage.


recent
Allows you to dynamically create a list of IP addresses and then match against that list in a few different ways.

For example, you can create a "badguy" list out of people attempting to connect to port 139 on your firewall and then DROP all future packets from them without considering them.

--set, --rcheck, --update and --remove are mutually exclusive.

--name name
    Specify the list to use for the commands. If no name is given then DEFAULT will be used.
[!] --set
    This will add the source address of the packet to the list. If the source address is already in the list, this will update the existing entry. This will always return success (or failure if ! is passed in).

[!] --rcheck
    Check if the source address of the packet is currently in the list.
[!] --update
    Like --rcheck, except it will update the "last seen" timestamp if it matches.

--seconds seconds
    This option must be used in conjunction with one of --rcheck or --update. When used, this will narrow the match to only happen when the address is in the list and was seen within the last given number of seconds.


--hitcount hits
    This option must be used in conjunction with one of --rcheck or --update. When used, this will narrow the match to only happen when the address is in the list and packets had been received greater than or equal to the given value. This option may be used along with --seconds to create an even narrower match requiring a certain number of hits within a specific time frame. The maximum value for the hitcount parameter is given by the "ip_pkt_list_tot" parameter of the xt_recent kernel module. Exceeding this value on the command line will cause the rule to be rejected.


--rttl
    This option may only be used in conjunction with one of --rcheck or --update. When used, this will narrow the match to only happen when the address is in the list and the TTL of the current packet matches that of the packet which hit the --set rule. This may be useful if you have problems with people faking their source address in order to DoS you via this module by disallowing others access to your site by sending bogus packets to you.


/proc/net/xt_recent/* are the current lists of addresses and information about each entry of each list.
接下來,由於上面在 recent module 中定義了一個叫 SSH 的 ip list,可以在 /proc/net/xt_recent/ 找到,表中會列出所有被記錄的ip :
sudo vi /proc/net/xt_recent/SSHsrc=123.207.121.114 ttl: 45 last_seen: 4313429922 oldest_pkt: 16 4313382171, 4313383171, 4313383171, 4313383171, 4313428172, 4313428172, 4313428172, 4313428421, 4313428421, 4313428421, 4313428921, 4313428921, 4313428921, 4313429922, 4313429922, 4313429922, 4313338611, 4313338611, 4313339111, 4313339111, 4313339111, 4313340112, 4313340112, 4313340112, 4313381422, 4313381422, 4313381422, 4313381672, 4313381672, 4313381672, 4313382171, 4313382171
src=141.98.80.65 ttl: 53 last_seen: 4313685072 oldest_pkt: 2 4313659697, 4313685072
src=167.99.212.191 ttl: 47 last_seen: 4316419298 oldest_pkt: 3 4316346862, 4316369314, 4316419298
src=177.155.180.6 ttl: 51 last_seen: 4316487553 oldest_pkt: 24 4316345951, 4316345951, 4316345951, 4316346451, 4316346451, 4316346451, 4316416554, 4316416554, 4316416554, 4316416803, 4316416803, 4316416803, 4316417303, 4316417303, 4316417303, 4316486803, 4316486803, 4316486803, 4316487053, 4316487053, 4316487053, 4316487553, 4316487553, 4316487553, 4316275995, 4316275995, 4316276495, 4316276495, 4316276495, 4316345700, 4316345700, 4316345700
src=221.181.185.29 ttl: 42 last_seen: 4316221329 oldest_pkt: 3 4316216698, 4316219211, 4316221329
.......
列出規則
如果想要列出iptables 中所有規則,有兩種做法,根據 How To List and Delete Iptables Firewall Rules | DigitalOcean ,第一種作法,列出所有規則的 specification:
sudo iptables -S-P INPUT ACCEPT
-P FORWARD DROP
-P OUTPUT ACCEPT
-N f2b-sshd
-A INPUT -p tcp -m multiport --dports 22 -j f2b-sshd
.......
-A f2b-sshd -s 60.12.136.62/32 -j REJECT --reject-with icmp-port-unreachable
-A f2b-sshd -s 92.63.199.9/32 -j REJECT --reject-with icmp-port-unreachable
-A f2b-sshd -j RETURN或只列出 INPUT chain:
sudo iptables -S INPUT-P INPUT ACCEPT
-A INPUT -p tcp -m multiport --dports 22 -j f2b-sshd第二種做法是列出所有規則成表格:
sudo iptables -L
Chain INPUT (policy ACCEPT)
target     prot opt source               destination
f2b-sshd   tcp  --  anywhere             anywhere             multiport dports ssh

Chain FORWARD (policy DROP)
target     prot opt source               destination
DOCKER-USER  all  --  anywhere             anywhere
DOCKER-ISOLATION-STAGE-1  all  --  anywhere             anywhere
ACCEPT     all  --  anywhere             anywhere             ctstate RELATED,ESTABLISHED
DOCKER     all  --  anywhere             anywhere
ACCEPT     all  --  anywhere             anywhere
ACCEPT     all  --  anywhere             anywhere
ACCEPT     all  --  anywhere             anywhere             ctstate
.....


Chain f2b-sshd (1 references)
target     prot opt source               destination
REJECT     all  --  157.230.63.81        anywhere             reject-with icmp-port-unreachable

REJECT     all  --  60.12.136.62         anywhere             reject-with icmp-port-unreachable
REJECT     all  --  92.63.199.9          anywhere             reject-with icmp-port-unreachable
RETURN     all  --  anywhere             anywhere
或只列出 INPUT chain :
sudo iptables -L INPUTChain INPUT (policy ACCEPT)
target prot opt source destination
f2b-sshd tcp -- anywhere anywhere multiport dports ssh若想看到詳細的封包數量跟bytes資訊,可以加上 -v:
sudo iptables -L INPUT -vChain INPUT (policy ACCEPT 2026 packets, 1711K bytes)
pkts bytes target prot opt in out source destination
7158 488K f2b-sshd tcp -- any any anywhere anywhere multiport dports ssh刪除規則
刪除規則也有兩種做法:
方法一:
如果知道規則的 Specification 為 -A INPUT -m conntrack --ctstate INVALID -j DROP (可透過 iptables -S 列出找到)
由 -A INPUT 可知該規則是加在 INPUT chain, 則可在刪除指令 iptables -D 後面接上 INPUT -m conntrack --ctstate INVALID -j DROP 刪除該規則:
sudo iptables -D INPUT -m conntrack --ctstate INVALID -j DROP
方法二:
列出 INPUT chain 中規則的號碼:
sudo iptables -L INPUT --line-numbersChain INPUT (policy ACCEPT)
num target prot opt source destination
1 f2b-sshd tcp -- anywhere anywhere multiport dports ssh輸入規則的號碼刪除:
sudo iptables -D INPUT 1note: 每次刪除後,後面的規則號碼都會往前推進,所以如果要連續刪除多個規則,最好再次查看號碼。
儲存與載入規則
若想要開機自動載入規則,可安裝 iptables-persistent :
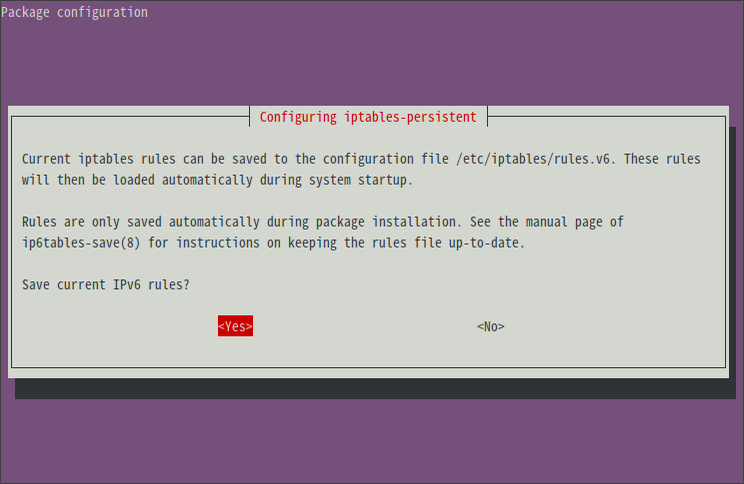
sudo apt-get install iptables-persistent根據 Ubuntu Server 如何永久儲存iptables的設定? | MagicLen
iptables-persistent套件在安裝時,就會跳出是否要儲存目前iptables和ipv6tables的畫面。
選擇
Yes的話,就可以把iptables或ip6tables的設定,分別透過iptables-save和ip6tables-save指令,儲存到/etc/iptables/rules.v4和/etc/iptables/rules.v6檔案中。如此一來,Ubuntu Server在開機時,就會自動使用iptables-restore和ip6tables-restore指令來套用/etc/iptables/rules.v4和/etc/iptables/rules.v6中儲存的設定。
若您在安裝
iptables-persistent套件之後,又去修改了iptables或是ipv6tables的設定,並且想永久保存下來的話,可以執行以下指令,來讓iptables-persistent套件重新詢問是否要以目前的iptables和ipv6tables設定來修改/etc/iptables/rules.v4和/etc/iptables/rules.v6檔案。sudo dpkg-reconfigure iptables-persistent

注意:若要停止套用,則直接刪除/etc/iptables/rules.v4和/etc/iptables/rules.v6檔案即可
另外,安裝後可以確定服務有無正常啟動,參考 How to save iptables firewall rules permanently on Linux - nixCraft :
確定服務有啟動:
sudo systemctl is-enabled netfilter-persistent.service若沒有啟動的話,執行:
sudo systemctl enable netfilter-persistent.service取得服務狀態:
sudo systemctl status netfilter-persistent.service● netfilter-persistent.service - netfilter persistent configuration
Loaded: loaded (/lib/systemd/system/netfilter-persistent.service; enabled; vendor preset: enabled)
Drop-In: /etc/systemd/system/netfilter-persistent.service.d
└─iptables.conf
Active: active (exited) since Sat 2021-01-30 23:18:15 CST; 1 day 17h ago
Docs: man:netfilter-persistent(8)
Main PID: 3849105 (code=exited, status=0/SUCCESS)
Tasks: 0 (limit: 77197)
Memory: 0B
CGroup: /system.slice/netfilter-persistent.service
Jan 30 23:18:15 server systemd[1]: Starting netfilter persistent configuration...
Jan 30 23:18:15 server netfilter-persistent[3849109]: run-parts: executing /usr/share/netfilter-persistent/plugins.d/15>
Jan 30 23:18:15 server netfilter-persistent[3849112]: Warning: skipping IPv4 (no rules to load)
Jan 30 23:18:15 server netfilter-persistent[3849109]: run-parts: executing /usr/share/netfilter-persistent/plugins.d/25>
Jan 30 23:18:15 server netfilter-persistent[3849115]: Warning: skipping IPv6 (no rules to load)
Jan 30 23:18:15 server systemd[1]: Finished netfilter persistent configuration.由於 iptables 無法暫時關閉某幾條規則,根據 How to temporarily disable an iptables rule – Gary Siel 的做法,我們可以透過 iptables-save 指令將目前的規則存成兩個檔案,其中一個代表啟用該規則(enable),另一個代表關閉該規則(disable),然後用vi 編輯代表 disable 的檔案,將欲關閉的規則刪除,再儲存。之後就可以用 iptables-restore 指令載入不同的規則檔案(enable or disable) 進行切換。
sudo iptables-save > ~/firewall-v1\(enable\).rules
sudo iptables-save > ~/firewall-v1\(disable\).rules
sudo vi ~/firewall-v1\(disable\).rulessudo iptables-restore ~/firewall-v1\(disable\).rulessudo iptables-restore ~/firewall-v1\(enable\).rules攻擊行為分析
根據前面建立的規則,可以查看 INPUT chain 裡面的規則被觸發的封包數量:
sudo watch iptables -L INPUT -vChain INPUT (policy ACCEPT 51829 packets, 9703K bytes)
pkts bytes target prot opt in out source destination
32084 1908K tcp -- any any anywhere anywhere tcp dpt:ssh state NEW recent: SET name: SSH side: source mask: 255.255.255.255
30974 1843K LOG tcp -- any any anywhere anywhere tcp dpt:ssh state NEW recent: UPDATE seconds: 3600 hit_count: 5 TTL-Match name: SSH side: source mask: 255.255.255.255 LOG level warning prefix "SSH-HIT-RATE: "
30974 1843K DROP tcp -- any any anywhere anywhere tcp dpt:ssh state NEW recent: UPDATE seconds: 3600 hit_count: 5 TTL-Match name: SSH side: source mask: 255.255.255.255
根據 Where can I find the iptables log file, and how can I change its location? - Ask Ubuntu :
The log file of theLOGaction is found at either/var/log/syslog(Ubuntu and similar OSs) or/var/log/messages(CentOS and similar OSs).
ubuntu 中,通常LOG 會記錄 /var/log/syslog 中,用 vi 開啟記錄檔:
sudo vi /var/log/syslog搜尋 SHH-HIT-RATE :
/SSH-HIT-RATEJan 30 20:53:40 server kernel: [8215725.487052] SSH-HIT-RATE: IN=eno1 OUT= MAC=00:25:90:e5:7f:3f:7c:ad:74:91:bd:40:08:00 SRC=103.233.3.137 DST=1xx.xx.xx.xx LEN=60 TOS=0x00 PREC=0x00 TTL=50 ID=7081 DF PROTO=TCP SPT=42358 DPT=22 WINDOW=64240 RES=0x00 SYN URGP=0
Jan 30 20:46:08 server kernel: [8215273.611349] SSH-HIT-RATE: IN=eno1 OUT= MAC=00:25:90:e5:7f:3f:7c:ad:74:91:bd:40:08:00 SRC=68.183.115.108 DST=1xx.xx.xx.xx LEN=60 TOS=0x00 PREC=0x00 TTL=52 ID=51054 DF PROTO=TCP SPT=56956 DPT=22 WINDOW=64240 RES=0x00 SYN URGP=0
Jan 30 20:53:02 server kernel: [8215688.317548] SSH-HIT-RATE: IN=eno1 OUT= MAC=00:25:90:e5:7f:3f:7c:ad:74:91:bd:40:08:00 SRC=210.94.133.243 DST=1xx.xx.xx.xx LEN=60 TOS=0x00 PREC=0x00 TTL=49 ID=2761 DF PROTO=TCP SPT=45738 DPT=22 WINDOW=29200 RES=0x00 SYN URGP=0
Jan 30 12:20:19 aifr-2-0 kernel: [ 5534.522732] SSH-HIT-RATE: IN=eno1 OUT= MAC=d4:5d:64:b3:fc:01:00:1f:1f:e3:da:da:08:00 SRC=85.235.64.225 DST=1xx.xx.xx.xx LEN=60 TOS=0x00 PREC=0x00 TTL=46 ID=48079 DF PROTO=TCP SPT=45300 DPT=22 WINDOW=42340 RES=0x00 SYN URGP=0
.......
Jan 30 12:20:20 aifr-2-0 kernel: [ 5535.534928] SSH-HIT-RATE: IN=eno1 OUT= MAC=d4:5d:64:b3:fc:01:00:1f:1f:e3:da:da:08:00 SRC=85.235.64.225 DST=1xx.xx.xx.xx LEN=60 TOS=0x00 PREC=0x00 TTL=46 ID=48080 DF PROTO=TCP SPT=45300 DPT=22 WINDOW=42340 RES=0x00 SYN URGP=0
Jan 30 12:20:22 aifr-2-0 kernel: [ 5537.546945] SSH-HIT-RATE: IN=eno1 OUT= MAC=d4:5d:64:b3:fc:01:00:1f:1f:e3:da:da:08:00 SRC=85.235.64.225 DST=1xx.xx.xx.xx LEN=60 TOS=0x00 PREC=0x00 TTL=46 ID=48081 DF PROTO=TCP SPT=45300 DPT=22 WINDOW=42340 RES=0x00 SYN URGP=0分別查看兩台電腦的紀錄,發現雖然ip不同,但MAC都是一樣的....
根據 Why do we see long MAC address in iptables log message? - Red Hat Customer Portal 的解說,iptables 紀錄的MAC值是由三個部分組成:
- The MAC address logged in the file is longer than expected, as it is indicating several pieces of information:
MAC=00:60:dd:45:67:ea:00:60:dd:45:4c:92:08:00
- This can be broken up into three different pieces of information. Souce MAC, Destination MAC and frame type.
00:60:dd:45:67:ea: Destination MAC=00:60:dd:45:67:ea
00:60:dd:45:4c:92: Source MAC=00:60:dd:45:4c:92
08:00 : Type=08:00 (ethernet frame carried an IPv4 datagram)
可以發現電腦A 是從 7c:ad:74:91:bd:40 發出攻擊的,而電腦B是從 00:1f:1f:e3:da:da 發出的,這兩個 MAC 很有可能是兩台電腦各自所屬 Router 的 MAC address,因為 Source 只會紀錄最後廣播出來的機器的 MAC address [1]。所以如果 ban 掉這兩個MAC address 的話,可能會把入口 Router ban 掉,而無法接收任何連線了...。
由於電腦A在遠端,為了確認 7c:ad:74:91:bd:40 確實是 gateway router 的MAC address,我建立了一個規則,用我的筆電從外部連線進去,當 ip 為我筆電的對外ip時,在記錄檔中產生一條紀錄:
# 建立一個名稱為myset, 類別為 hash:ip 的ipset
sudo ipset create myset hash:ip
# 在 myset 中新增 ip 1xx.xx.xx.xx
sudo ipset add myset 1xx.xx.xx.xx

# 透過 -m set --match-set myset src 指令指定來源要 match 的 ipset 為 myset
sudo iptables -A INPUT -p tcp --dport 22 -m state --state NEW -m set --match-set myset src -j LOG --log-prefix 'From-My-Computer: '
Feb 2 14:01:50 server kernel: [8450224.822860] From-My-Computer: IN=eno1 OUT= MAC=00:25:90:e5:7f:3f:7c:ad:74:91:bd:40:08:00 SRC=1xx.xx.xx.xx DST=1xx.xx.xx.xx LEN=104 TOS=0x00 PREC=0x00 TTL=60 ID=34712 DF PROTO=TCP SPT=42428 DPT=22 WINDOW=14734 RES=0x00 ACK PSH URGP=0該紀錄的 source ip 是我筆電的對外 ip,而MAC 仍然是 7c:ad:74:91:bd:40 ,證明了這個MAC 應該是 router 的MAC,任何從外部的連線都會經過它。
注意:
上面規則使用到 ipset ,若只使用 iptables 建立規則,在使用-s 1xx.xx.xx.xx指定 source ip 後,會造成sudo watch iptables -L INPUT -v無法開啟 table,產生Another app is currently holding the xtables lock. Perhaps you want to use the -w option?錯誤訊息:sudo iptables -A INPUT -p tcp --dport 22 -s 1xx.xx.xx.xx -m state --state NEW -j LOG --log-prefix 'From-My-Computer: '問題似乎是出在
-s 1xx.xx.xx.xx指定了public ip,如果使用內網ip-s 192.168.2.100就不會出現錯誤。
如果改成使用 ipset,就完全不會出現這個問題,而且效能更好。
參考
而電腦B是在我辦公室的 router 後面,經過調查[2],00:1f:1f:e3:da:da 確實是我辦公室的 router 的 MAC address ,而當我將電腦B的對外port 22 關閉後,攻擊就停止了。而 router 後面沒有開啟對外port 的其他電腦,也都沒看到攻擊紀錄。因此推測此攻擊應該是來自外部,通過大量掃描對外 ip 的 open port ,嘗試進行ssh登入。
但我還不知道如果連線是來自區網內部的設備,究竟 MAC 會是該設備還是 router。為了驗證我的想法,我在電腦B設定規則,然後用我的筆電連進去看紀錄檔(我的筆電跟電腦B在同一個區網,ip: 192.168.2.100)
# 建立一個名稱為myset, 類別為 hash:ip 的ipset
sudo ipset create myset hash:ip
# 在 myset 中新增 ip
sudo ipset add myset 192.168.2.100

# 透過 -m set --match-set myset src 指令指定來源要 match 的 ipset 為 myset
sudo iptables -A INPUT -p tcp --dport 22 -m state --state NEW -m set --match-set myset src -j LOG --log-prefix 'SSH-NEW-DEBUG1: '
開啟另外一個新的ssh連線時,記錄檔就會新增一條紀錄:
sudo vi /var/log/syslog搜尋 SSH-NEW-DEBUG1 ,找到一條紀錄:
Feb 2 10:05:03 aifr-2-0 kernel: [256621.698163] SSH-NEW-DEBUG1: IN=eno1 OUT= MAC=d4:5d:64:b3:fc:01:38:d5:47:97:c1:05:08:00 SRC=192.168.2.100 DST=192.168.2.102 LEN=52 TOS=0x00 PREC=0x00 TTL=128 ID=3289 DF PROTO=TCP SPT=11776 DPT=22 WINDOW=64240 RES=0x00 SYN URGP=0發現來源MAC 是 38:d5:47:97:c1:05 ,是我筆電網卡的MAC,而非router的MAC。證明了如果攻擊是從內部發出的,應該不會帶有router 的MAC 資訊,而從外部攻擊的話,一定會經過router,所以會帶有router 的 MAC 資訊。
[1] Ban the MAC! Feature Request · Issue #1920 · fail2ban/fail2ban · GitHub
(the MAC addresses are removed once it crosses out of the broadcast domain (moves across a router)
[2] 直接登入router 設定頁面,查看它的MAC address
[3] 可以使用 ifconfig -a 查看網卡的 MAC address
系列文章
server 受 ssh暴力登入攻擊的分析與防禦(1)--iptables 的使用
server 受 ssh暴力登入攻擊的分析與防禦(2)--fail2ban 的使用