Ubuntu 20.04 + RTX 3090 使用Anaconda 建置 Python 3.6 + Tensorflow 1.15 環境
最近實驗室買了新顯卡 RTX 3090,想要把它裝在 Ubuntu 20.04 系統上使用,但是卻發現 Ubuntu 20.04 的預設 python 版本已經到了3.8.X ,而我們實驗室之前開發是採用 tensorflow 1.12 版,只支援到 python 3.6 。如果要更新到 tensorflow 2.x 版,原來的程式碼可能要改很多東西,有點麻煩;所以想在儘量不離開tensorflow 1.x 版的情況下,讓這張顯卡可以順利運作。以下就是我的操作步驟:
執行以下指令,安裝最新版驅動
## code name ##
# 16.04 xenial
# 18.04 bionic
# 20.04 focal
###############
# 1. "lsb_release -a" get the distribution information
# 2. "grep" get the line contains "Codename"
# 3. "cut" get the second column of tab delimiter line
######
# to fix "No LSB modules are available." error
# install lsb-core
###
# Ubuntu Linux ,判斷 Linux版本資訊 與 解決 No LSB modules are available. 訊息 | 龍崗山上的倉鼠
# https://kanchengzxdfgcv.blogspot.com/2016/03/ubuntu-linux-no-lsb-modules-are.html
######
# get os version
CODENAME=$(lsb_release -a | grep "Codename" | cut -d$'\t' -f2)
echo $CODENAME

# Proprietary GPU Drivers : "Graphics Drivers" team
# https://launchpad.net/~graphics-drivers/+archive/ubuntu/ppa
# add ppa repository
sudo add-apt-repository -y ppa:graphics-drivers/ppa
sudo apt-get update
sudo apt-get upgrade -y

# purge all previous version (--purge removes configuration files)
sudo apt-get remove --purge -y nvidia-*

# check if ubuntu version > 16.04, then retrive latest driver version
if [ $CODENAME == "xenial" ]
then
NVIDIA_VERSION=$(sudo apt-cache search ^nvidia-[0-9]{3}$ | sort | tail -n -1 | cut -d' ' -f1)
else
NVIDIA_VERSION=$(sudo apt-cache search ^nvidia-driver-[0-9]{3}$ | sort | tail -n -1 | cut -d' ' -f1)
fi

# install latest version
sudo apt-get install -y $NVIDIA_VERSION
執行 nvidia-smi,如果出現以下字串表示安裝成功:
Fri Dec  4 06:15:09 2020
+-----------------------------------------------------------------------------+
| NVIDIA-SMI 455.45.01    Driver Version: 455.45.01    CUDA Version: 11.1     |
|-------------------------------+----------------------+----------------------+
| GPU  Name        Persistence-M| Bus-Id        Disp.A | Volatile Uncorr. ECC |
| Fan  Temp  Perf  Pwr:Usage/Cap|         Memory-Usage | GPU-Util  Compute M. |
|                               |                      |               MIG M. |
|===============================+======================+======================|
|   0  GeForce RTX 3090    On   | 00000000:01:00.0 Off |                  N/A |
|  0%   42C    P8    30W / 370W |      1MiB / 24265MiB |      0%      Default |
|                               |                      |                  N/A |
+-------------------------------+----------------------+----------------------+

+-----------------------------------------------------------------------------+
| Processes:                                                                  |
|  GPU   GI   CI        PID   Type   Process name                  GPU Memory |
|        ID   ID                                                   Usage      |
|=============================================================================|
|  No running processes found                                                 |
+-----------------------------------------------------------------------------+
安裝CUDA
以下指令安裝 cuda 10.0 和 cudnn 7 (注意:從官方文件中可以看到,tensorflow 1.14 只支援到 cuda 10.0,若安裝到cuda 10.1 就會出現錯誤)
# Installing CUDA 10.1 on Ubuntu 20.04 | by Stephen Gregory | Medium
# https://medium.com/@stephengregory_69986/installing-cuda-10-1-on-ubuntu-20-04-e562a5e724a0
# CUDA 10.0 installation on Ubuntu 20.04 or 18.04 for StyleGAN2 – Page 2 – Beeren Sahu
# https://beerensahu.wordpress.com/2020/09/28/cuda-10-0-installation-on-ubuntu-20-04-or-18-04-for-stylegan2/2/

# add PPA
# Explore and play around for different OS and cuda versions:
# http://developer.download.nvidia.com/compute/cuda/repos
sudo add-apt-repository ppa:graphics-drivers
sudo apt-key adv --fetch-keys http://developer.download.nvidia.com/compute/cuda/repos/ubuntu1804/x86_64/7fa2af80.pub

# add to source list
sudo bash -c 'echo "deb http://developer.download.nvidia.com/compute/cuda/repos/ubuntu1804/x86_64 /" > /etc/apt/sources.list.d/cuda.list'
sudo bash -c 'echo "deb http://developer.download.nvidia.com/compute/machine-learning/repos/ubuntu1804/x86_64 /" > /etc/apt/sources.list.d/cuda_learn.list'

# install cuda 10.0
sudo apt update
sudo apt install cuda-10-0
sudo apt install libcudnn7
設定環境變數
建議寫入設定到 ~/.bash_profile ,這只要有login 就會執行;若是要用非登錄非交互的ssh 執行指令,例如 ssh server CMD,建議在 CMD 前面加上 source ~/.bash_profile ,每次都重新載入環境變數
非登錄非交互之shell環境設定,參考:https://wido.me/sunteya/understand-bashrc-and-profile
執行以下指令,將把環境變數寫入 ~/.bash_profile ,如不存在則建立一個新的
# if there are no ~/.bash_profile, create it!
if [ ! -f ~/.bash_profile ]; then
echo ".bash_profile doesn't exist"
cat <<"EOF" >>~/.bash_profile
# .bash_profile

# Get the aliases and functions
if [ -f ~/.bashrc ]; then
    . ~/.bashrc
fi

# User specific environment and startup programs

PATH=$PATH:$HOME/.local/bin:$HOME/bin

export PATH

# User specific aliases and functions
EOF
else
echo ".bash_profile exist!"
fi

# setup cuda env path
echo -e "LD_LIBRARY_PATH=/usr/local/cuda/lib64:\$LD_LIBRARY_PATH" >> ${HOME}/.bash_profile

cat <<"EOF" >> ~/.bash_profile
# set PATH for cuda 10.0 installation
if [ -d "/usr/local/cuda-10.0/bin/" ]; then
    export PATH=/usr/local/cuda-10.0/bin${PATH:+:$PATH}
    export LD_LIBRARY_PATH=/usr/local/cuda-10.0/lib64${LD_LIBRARY_PATH:+:$LD_LIBRARY_PATH}
else
    # set PATH for cuda 10.1 installation
    if [ -d "/usr/local/cuda-10.1/bin/" ]; then
        export PATH=/usr/local/cuda-10.1/bin${PATH:+:$PATH}
        export LD_LIBRARY_PATH=/usr/local/cuda-10.1/lib64${LD_LIBRARY_PATH:+:$LD_LIBRARY_PATH}
    fi
fi
EOF
執行 source ~/.bash_profile,載入新的設定。
執行 nvcc -V 如果出現以下字串表示安裝成功:
nvcc: NVIDIA (R) Cuda compiler driver
Copyright (c) 2005-2018 NVIDIA Corporation
Built on Sat_Aug_25_21:08:01_CDT_2018
Cuda compilation tools, release 10.0, V10.0.130
執行以下指令,檢查是否成功安裝 cuDNN
/sbin/ldconfig -N -v $(sed 's/:/ /' <<< $LD_LIBRARY_PATH) 2>/dev/null | grep libcudnn如果出現以下字串,表示安裝成功:
libcudnn.so.7 -> libcudnn.so.7.6.5
安裝Anaconda
以下指令會從官網下載 Anaconda 2020.11 版(最新版請參考官網列表),並且無聲安裝到 /share/apps/Anaconda3 底下
curl -O https://repo.anaconda.com/archive/Anaconda3-2020.11-Linux-x86_64.sh
bash Anaconda3-*-Linux-x86_64.sh -b -p /share/apps/Anaconda3
如果想要驗證下載回來的檔案是否正確,可以執行
sha256sum Anaconda3-2020.11-Linux-x86_64.sh輸出
cf2ff493f11eaad5d09ce2b4feaa5ea90db5174303d5b3fe030e16d29aeef7de Anaconda3-2020.11-Linux-x86_64.sh
如果跟官網hash列表上的對應版本 sha256 hash code 一致,表示下載回來的檔案與官方檔案相同,沒有錯誤或竄改。
設定環境變數
執行以下指令,將把環境變數寫入 ~/.bash_profile ,如不存在則建立一個新的
# if there are no ~/.bash_profile, create it!
if [ ! -f ~/.bash_profile ]; then
echo ".bash_profile doesn't exist"
cat <<"EOF" >>~/.bash_profile
# .bash_profile

# Get the aliases and functions
if [ -f ~/.bashrc ]; then
    . ~/.bashrc
fi

# User specific environment and startup programs

PATH=$PATH:$HOME/.local/bin:$HOME/bin

export PATH

# User specific aliases and functions
EOF
else
echo ".bash_profile exist!"
fi

# need for conda
DST=/share/apps/Anaconda3
echo -e ". ${DST}/etc/profile.d/conda.sh" >> ${HOME}/.bash_profile

# need for jupyter notebook
echo -e "PATH=/share/apps/Anaconda3/bin:\$PATH" >> ${HOME}/.bash_profile
執行 source ~/.bash_profile,載入新的設定。
執行 conda -V 如出現以下字串即成功:
conda 4.9.2
執行 jupyter --version 如出現以下字串即成功:
jupyter core     : 4.6.3
jupyter-notebook : 6.1.4
qtconsole        : 4.7.7
ipython          : 7.19.0
ipykernel        : 5.3.4
jupyter client   : 6.1.7
jupyter lab      : 2.2.6
nbconvert        : 6.0.7
ipywidgets       : 7.5.1
nbformat         : 5.0.8
traitlets        : 5.0.5
建立 conda env
建立一個 python 3.6 的虛擬環境,命名為 py36 :
CONDA_ENV=py36
if [ -z "$(conda env list | grep $CONDA_ENV)" ];
then
conda create -n $CONDA_ENV python=3.6 nb_conda
else
echo "Already has $CONDA_ENV env"
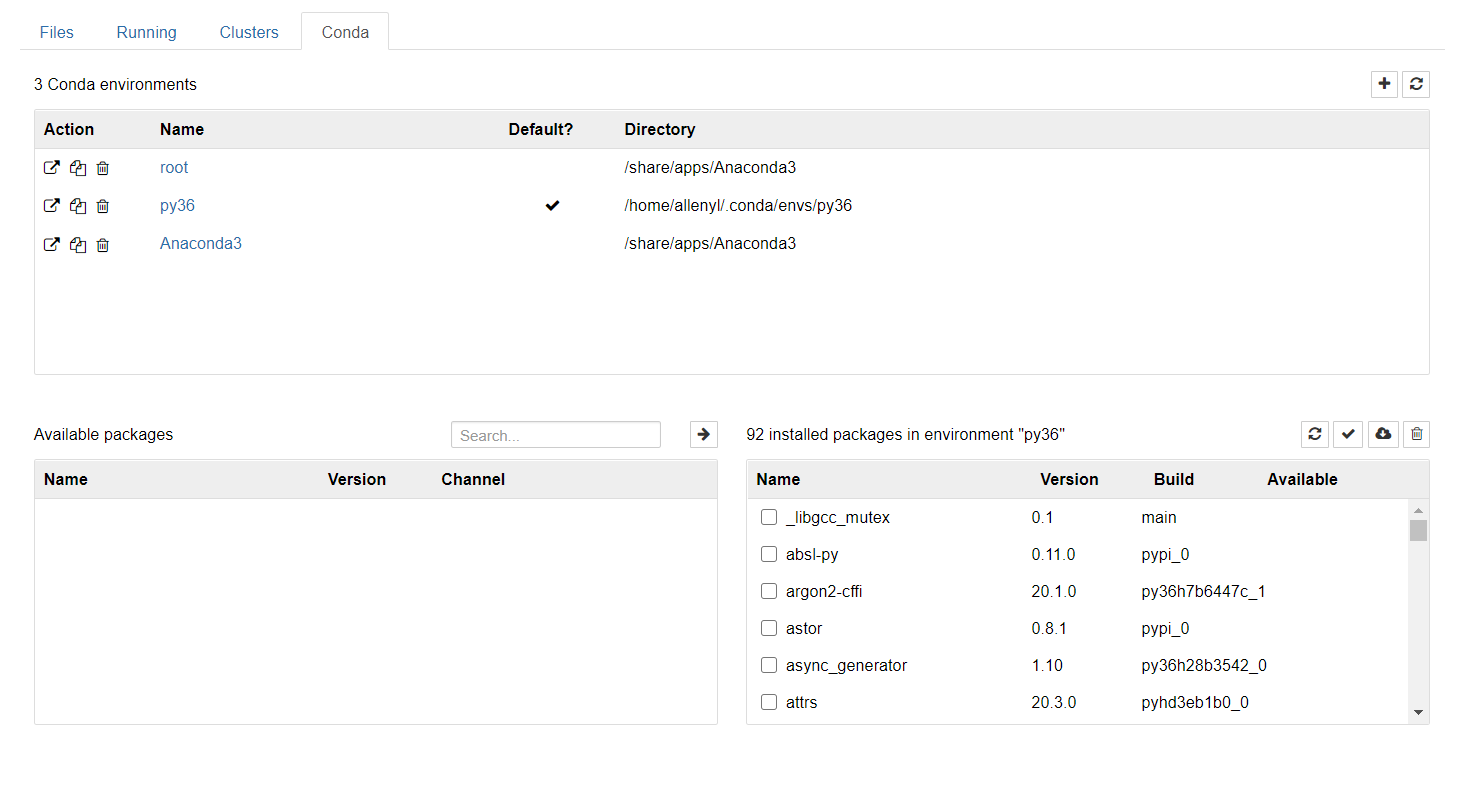
fi其中,套件 nb_conda 是一個 jupyter notebook 擴充套件,可以讓你管理及使用不同的conda env:
啟動虛擬環境
conda activate py36安裝 NVIDIA 版的 tensorflow 1.15
如果你直接透過 conda 或 pip 安裝 google 官方的 tensorflow 1.15,雖然安裝後tensorflow 可以抓到gpu 資訊,但在執行運算時會出現以下錯誤訊息:
E tensorflow/stream_executor/cuda/cuda_blas.cc:428] failed to run cuBLAS routine: CUBLAS_STATUS_EXECUTION_FAILED多方搜尋後,終於找到這裡有解決的線索,其實就是 NVIDIA 官方自己有維護一個tensorflow 1.x 版,這個版本會設法支援最新的硬體:
 NVIDIA
按照上面的說明,NVIDIA 版的 wheels 並不在 pypi 中,因此必須要先加入 nvidia 的 wheel index:
$ pip install --user nvidia-pyindex再安裝最新版的 nvidia-tensorflow:
$ pip install --user nvidia-tensorflow[horovod]安裝完後,使用基本上沒有任何差異,一樣是 import tensorflow as tf
執行以下指令,如果找到GPU的話會顯示 /device:GPU:0
python3 2>/dev/null << EOF
import tensorflow as tf
print(tf.test.gpu_device_name())
EOF
其中 2>/dev/null 表示將 stderr 重新導向到 /dev/null ,該檔案作用像是一個黑洞,寫進去任何東西都會消失,讀出來沒有任何東西。
執行以下指令,指定tensorflow 使用 GPU:0 :
python3 2>/dev/null << EOF
import tensorflow as tf
with tf.device('/gpu:0'):
    a = tf.constant([1.0, 2.0, 3.0, 4.0, 5.0, 6.0], shape=[2, 3], name='a')
    b = tf.constant([1.0, 2.0, 3.0, 4.0, 5.0, 6.0], shape=[3, 2], name='b')
    c = tf.matmul(a, b)

    with tf.Session(config=tf.ConfigProto(log_device_placement=True)) as sess:
        print(sess.run(c))

EOF
其中 ConfigProto() 參數 log_device_placement=True 會印出執行操作所用的設備
輸出如下即表示成功
Device mapping:
/job:localhost/replica:0/task:0/device:XLA_GPU:0 -> device: XLA_GPU device
/job:localhost/replica:0/task:0/device:XLA_CPU:0 -> device: XLA_CPU device
/job:localhost/replica:0/task:0/device:GPU:0 -> device: 0, name: GeForce RTX 3090, pci bus id: 0000:01:00.0, compute capability: 8.6
MatMul: (MatMul): /job:localhost/replica:0/task:0/device:GPU:0
a: (Const): /job:localhost/replica:0/task:0/device:GPU:0
b: (Const): /job:localhost/replica:0/task:0/device:GPU:0
[[22. 28.]
 [49. 64.]]
訓練 model
到我的github 上 clone 一份下來,這是一個簡單的 bi-lstm-crf-tensorflow 範例:
allenyllee
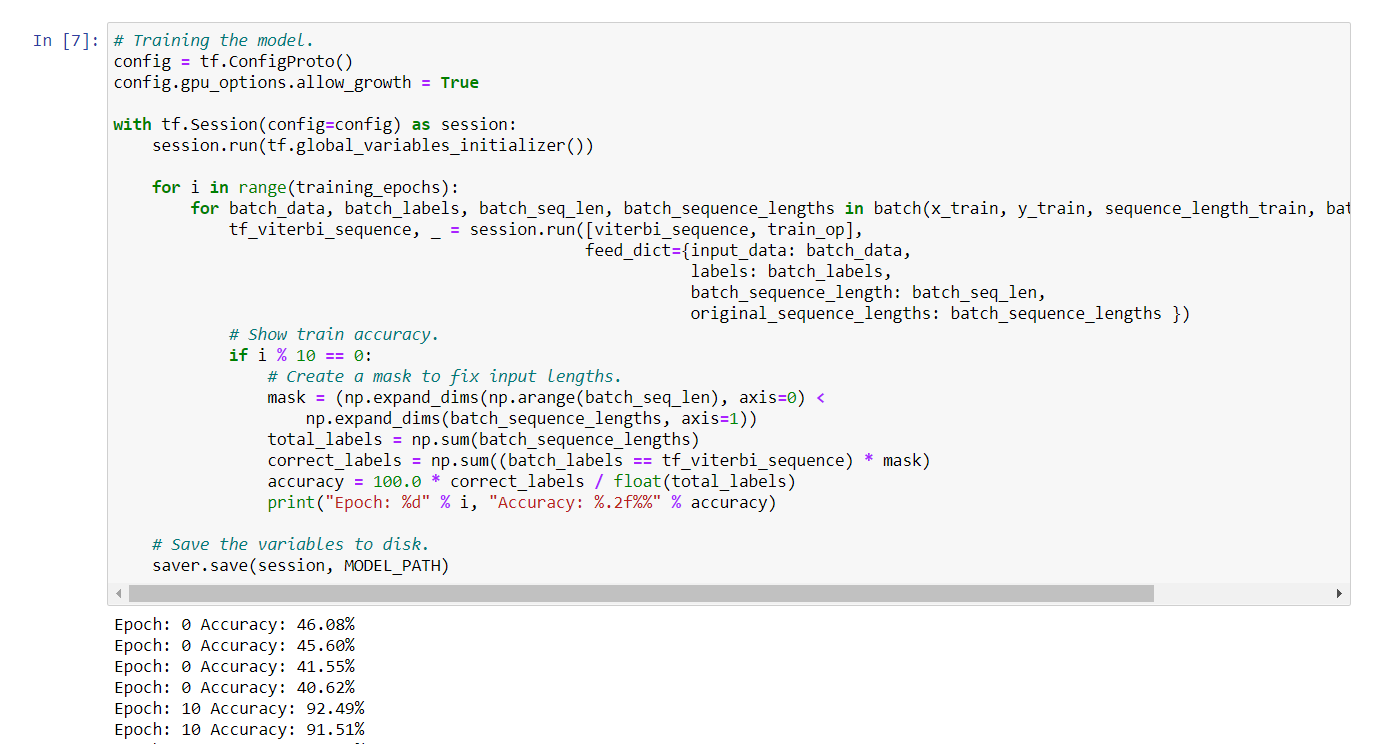
git clone https://github.com/allenyllee/bi-lstm-crf-tensorflow用 jupyter notebook 開啟 bi-lstm-crf-tensorflow.ipynb ,全部執行下來,若都能正常執行,就OK啦!
刪除 conda env
若要刪除虛擬環境,執行
conda env remove -n $CONDA_ENV